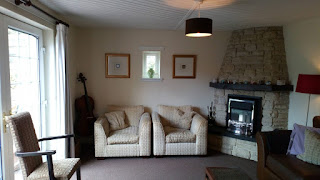
As each room in my house is 'finished' I thought I'd do a tour of all the things I did, bought, upcycled and re purposed. So here is my family room/den. Click on the photos to make them bigger.
When The Teenager (now a handsome 20yo!) lived at home, this room was his den and it was full of his stuff. When he went off to university he took some of that stuff and furniture with him and it's been a dumping room for 2 years. It's now a lovely second sitting room with patio doors that can be opened into the garden to enjoy the evening sun.
It all started when my lovely mum swapped this leather sofa with me. She needed it removed so she could make some changes in her house. She got 2 small wooden armchairs from me. I hadn't intended doing this room but once the sofa was in place I could see how this room would look. So I got cracking.
I didn't do any painting. The room was already (badly) painted cream and had a brown carpet (yuck!!) but with carefully positioned furniture it looks ok. You can see the badly worn patch of carpet in this photo.
This is the view from the door looking to the hideous fireplace in the corner. Ideally I'd rip this out but removing a similar one from my living room to install a woodburner cost me a small fortune last year. So it stays. The next owners of this house can do something with it! I used the red colour in the cat picture as inspiration so I bought a red lampshade. It cost £12 from B&Q. The leather/rattan coffee table was rescued from the garage. It was very dirty and needed a lot of cleaning!
You can just see in this photo I have a wooden ceiling. I also have one in the kitchen but it was stained an orange colour that took many coats of paint to cover up. Luckily this is already white! The 2 armchairs are part of the suite I had 2 houses ago. My oldest son has the sofa in his flat. The brown suede lampshade (looks nicer than it sounds!!) had 3 tiers, like an upside down wedding cake. I removed the bottom 2 tiers and it works better. The chair at the window is a carver from my dining table. It takes up too much space so it just gets brought back when I have lots of guests for dinner.
The cupboard contains some of my school stuff. But it originally belonged to my middle son when he was at university. His room didn't have a wardrobe so he bought this from IKEA 13 years ago. It was in the kitchen of my old house where I kept cups and glasses. The picture above the radiator is my upcycled canvas project HERE. Although I loved these curtains (pale blue and lavender ones that have been hung in 4 different houses and were originally in my bedroom here!) they were just wrong for the new look.
I bought these ones on Ebay for £3.50! Unfortunately they're not wide enough to close but I love them. They finish the room beautifully. The cello in the corner was an impulse buy a few years ago when I thought I could learn to play again (I played one in the school orchestra many years ago!) It's not that easy to pick up again without a music teacher!!
I bought a rug from B&Q. This ONE. It cost £78, my biggest expense but it finishes the sofa area and covers up the worn carpet.
It looks like knitted fabric!
Everything else in this room has been shopped from home. Some things I've just moved from other rooms and some things I've brought out of storage. When my ex left he didn't want anything from the family home when we sold it so I still have lots of pieces in storage I can use.
The Teenager went through a phase of collecting crystals. I don't think you're meant to mix them but I thought they looked pretty together in this bowl.
I have a 'tasteful' collection of snow globes that OH brings me every time he goes somewhere abroad for work 😆 They make me smile!
The electric fire was relocated from my living room last year. The chimney has been blocked with a balloon to stop draughts.
These pictures were stored away in my eaves. The frame is 50cm by 50cm but the 'picture' itself is just 7cm by 7cm. Then it's been double mounted.
It's just a few squares of card/paper, then some foil then a foil wrapped square with some wire. Very simple and very effective. I have a damaged one that I'm hoping to re do myself for another room.
This green Maling vase belonged to my Gran (not a great pic but it's green). It's old but not valuable. Some history about Maling pottery HERE.
This wastepaper bin was being thrown out by the owners of my previous house so I rescued it. It's very sturdy.
Apart from a lap quilt I'm working on for the sofa, I'm not going to do any more to this room so I guess it's finished. Ideally I'd love a new carpet but it's low on my priority list atm. It's in the extended part of my house. The ceiling is about 20cm lower than normal so it's quite a dark room during most of the day (hence some of photos are hard see.) However it faces west and benefits from the sun at the end of the day and is a lovely place to sit after work.
Cost: £93.50
Time: 2 days


